Do you have the Haverly Add-in activated? Originally for indexing GRTMPS input data spreadsheets, it also has some useful functions for working with your PSI workbooks and for analysing solutions.
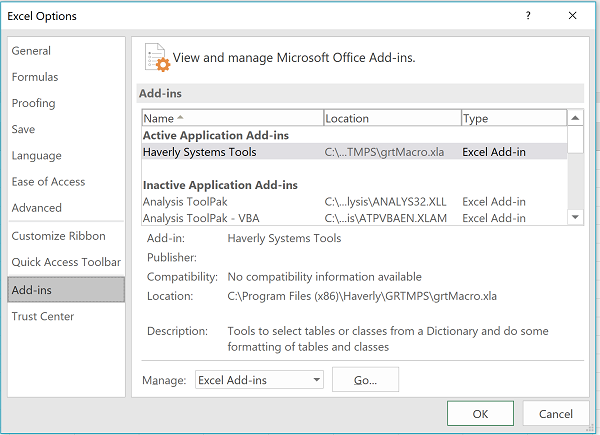
If you have GRTMPS installed, but don’t see Haverly on your Add-ins tab or menu (I’m showing Excel 2016 here), then the first thing you need to do is activate it. This is rather a long sequence. Open Excel. Choose File, then Options. When the Options dialogue box opens, select “Add-ins” from the left hand menu. Now you have a list of the add-ins that are already known about, and near the bottom another little tool box labelled “Manage” Choose Excel Add-ins, as shown and press “Go”.
| You will see the list of add-ins. (A diaologue box identical to the one that you used to be able to get to directly from the tool bar!) If Haverly Systems Tools is already there, just tick it to activate. If no, click browse and go find it. The file you want is “grtMacro.xla”. It will be in your main GRTMPS program folder. The default for that is C:\Program Files (x86)\Haverly\GRTMPS. But if your installation folder is elsewhere and you can’t find it, then open g5, choose Tools: System Tools: System Folders. The various installation and working directories are displayed – the system folder is the first one, and the add-in file should be in there. Once you have selected the file and activated it, back out to the main Excel home page. Do you have the Add-Ins tab and the Haverly option as shown above? If not, close Excel and re-open. If it still doesn’t appear, restart the computer. If it still doesn’t appear you might be in that group of people hit with a known Excel issue where some versions have problems with Add-ins. (Google – Add-ins tab does not appear). | 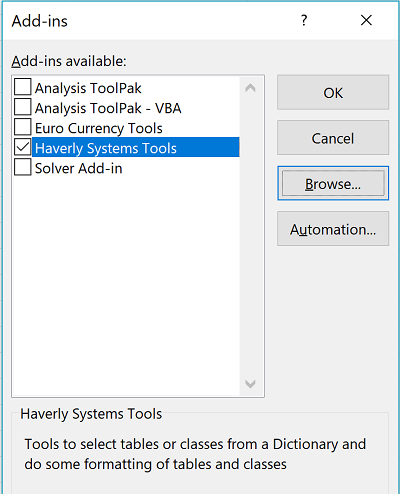 |
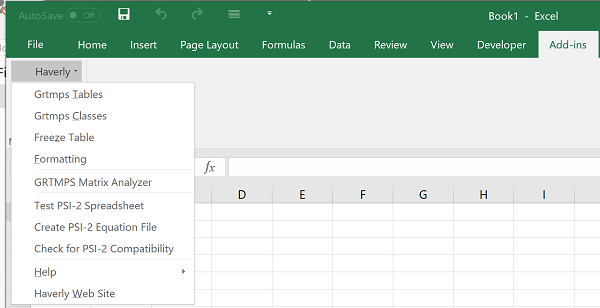
Once you do have your add-in going, there are three main sets of functions, as shown in the menu picture at the top.
PSI Tools
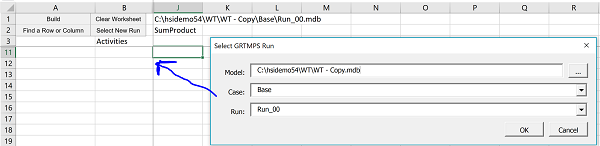
There three functions that you can use within a PSI workbook. “Test PSI-2 Spreadsheet” allows you to load a set of input data for the simulator. You will need to choose an “SMI” file that was generated by a run that used the simulator. This will load that set of pool qualities and show you the results of the simulator calculations in the output range.
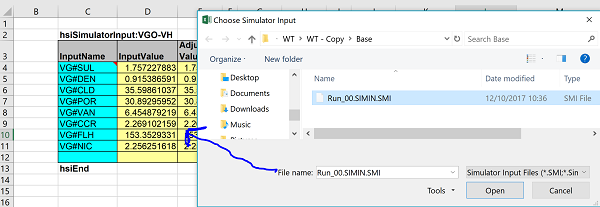
This replaces the “TEST” button that was used inside the PSI-1 workbooks. Using an add-in means that your simulators can be set up in macro-free workbooks. There will be a more detailed desk note at some future date to explore in more detail how this feature can be used to improve your models.
There three functions that you can use within a PSI workbook. “Test PSI-2 Spreadsheet” allows you to load a set of input data for the simulator. You will need to choose an “SMI” file that was generated by a run that used the simulator. This will load that set of pool qualities and show you the results of the simulator calculations in the output range.
This replaces the “TEST” button that was used inside the PSI-1 workbooks. Using an add-in means that your simulators can be set up in macro-free workbooks. There will be a more detailed desk note at some future date to explore in more detail how this feature can be used to improve your models.
“Create PSI-2 Equation File” extracts the calculations from the workbook – if it is in PSI-2 format – and creates an equation file that can be distributed with the model, so that Excel does not need to run at all during your optimizations. This function is also available via the g5 interface as a right-click on the selected PSI workbooks on the Process Simulator Interface panel or the unit AR tab.
“Check for PSI-2 Compatibility” will attempt to convert your simulator to the PSI-2 equation file and tell you about any missing section headers or unsupported functions. This function is also available via the g5 interface as a right-click on the selected PSI workbooks on the Process Simulator Interface panel or the unit AR tab. If you haven’t switched to PSI-2 yet, you really should have a look at this. Even if you need to make some adjustments to your formulae, as there is a considerable speed advantage at run-time. (And if you have an external dll that you are calling, that can be handled by PSI-2 from 5.4).
Matrix Analyzer
This is a very useful tool for stuudying solutions and model designs, designed and built by Kirby English. Start with an Empty workbook. Select a solution database, that must have been produced with the SOLTODB option active, and then you can choose rows and columns so you can see how activities and constraints balance out in the final matrix.
This is also a topic that deserves its own note – so watch the Desk for more detail.
GRTMPS Tables – GRTMPS Classes – Freeze Table – Formatting
The top set of options in the Add-in menu represent the original functionality, designed and built by Bill Tromans, for indexing and working with spreadsheets containing OMNI format data. Note (particularly you database modellers) that this could be output data, as well as input data, as the solution tables in the TBL and TBX files can be loaded into spreadsheets. (By selecting that format option on the Output: General panel.)
The top set of options in the Add-in menu represent the original functionality, designed and built by Bill Tromans, for indexing and working with spreadsheets containing OMNI format data. Note (particularly you database modellers) that this could be output data, as well as input data, as the solution tables in the TBL and TBX files can be loaded into spreadsheets. (By selecting that format option on the Output: General panel.)
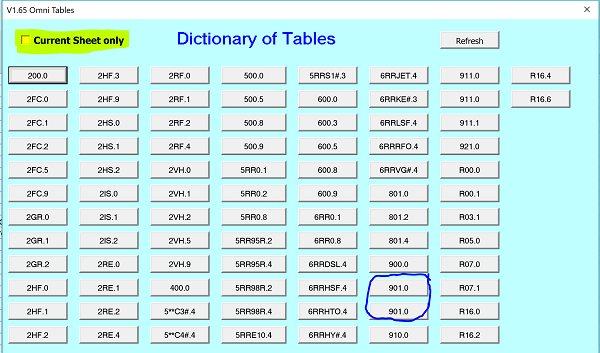
Here are the indexed tables from the Master.xlsx file of the Weight demo model. It is looking on all the sheets, by default – but you have the option, highlighted in yellow, to just see the list for the current sheet. Click on a box to jump to that Table. Note that if a table appears more than once in the file, such as 901.0, then it will appear multiple times in the list. By default the system assumes that the TABLE and CLASS keywords appear in column A – you can tell it to search further along under the Formatting options
You can also use the Formatting options to apply a consistent style to the tables.
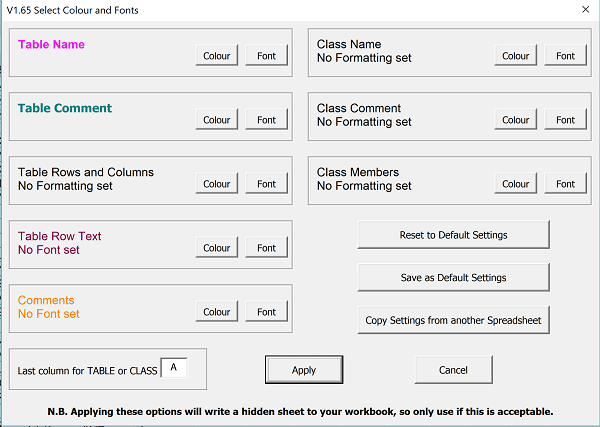
Probably you can come up with a better colour scheme – I was just messing around for demonstration purposes.
Have some really big blend data tables or process units? Try Freeze Table. This will set the normal Excel Freeze Pane option, but jump to the top corner of whatever table you are currently in, so you get the row and column names. Unset it via the standard View menu option.
Finally, if you have a Basic database model and the Add-in is active you can make use of the Table indexing system within the g5 interface, so that the tree nodes guide you to that type of data within all of your data files, very handy if you are working with a complicated model that you didn't write yourself. To get started, go to the Links to Files tab on the Data node and press the "Refresh all the links" button on the buttom left corner. Then when you click on a node, you will be shown the links into the files that contain that sort of data.
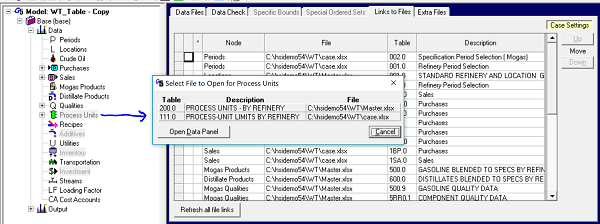
If you update the list of files, or changing their structure, then you will find your links aren't accurate any more and you need to go back and refresh them. If you do want to go into a data panel - process units for managing simulators or streams for managing crudes for example, then you can click the Open Data Panel button (or if you remember before you click on the node, and right-click it instead you can cut out this middle box.)
The official documentation for the Add-in can be found in the Knowledge Base as technical note HTN-0202. The Knowledge Base is found under the Help menu in the GRTMPS user interface or may be accessed on-line via your technical support account.
From Kathy's Hotel Room, Karlsruhe, Germany 12th October 2017.
Comments and suggestions gratefully received via the usual e-mail addresses or here.
You may also use this form to ask to be added to the distribution list so that you are notified via e-mail when new articles are posted.